Bicyclists are killed in accidents with motor vehicles every day, and almost half of those wrongful deaths are suffered by children under the age of 16. Even if the bicyclists survives the crash, the difference in weight and momentum between the bicycle and a car or truck results in catastrophic injuries that may involve brain damage, internal injuries, multiple fractures and paralysis. The life of the bicyclist and that of the family will be forever changed. The bicycle accident lawyers in our law firm are compassionate and understanding of the requirements of those injured in bicycle accidents, and is aggressive in pursuit of justice on behalf of their clients injured in bicycle collisions.
Who is responsible for the accident?
A driver can be held legally responsible if the driver failed to act reasonably in operating the motor vehicle. That is, if the driver did not use the level of skill and caution a reasonably prudent person would use in a similar situation, then that driver should compensate the person injured for the injuries and damages suffered in the accident.
Because driving is so heavily regulated, having laws attached to nearly every move a driver makes the doctrine of negligence frequently arise in the context of motor vehicle accidents. This doctrine holds that someone who violates the law, and in the process of doing so causes an injury the law was designed to prevent, is negligent. However, many times the driver of a motor vehicle will attempt to shift the blame of the collision to the bicycle rider, stating the bicycle rider acted reckless or careless therefore causing the accident. Our bicycle accident attorneys will conduct a complete investigation, consulting with a team of top investigators and accident reconstructionists to determine who is responsible for the accident and identify the cause of the accident.
Compensation for injuries and damages
When you or a loved one has been injured in a bicycle collision, you are facing many financial burdens. The expert injury accident lawyers in our law firm work with the necessary experts to determine the value of your claim to achieve compensation for your current and future medical bills, the wages you have lost and income you could lose due to your injuries or disability, pain and suffering, and other accident related damages. Our expert bicycle accident attorneys are tenacious in their goal to attain the maximum compensation for your injuries and damages.
Call the bicycle accident lawyers in our office to discuss your claim and find out how we can help you get what you need for today and the rest of your life. More on this website
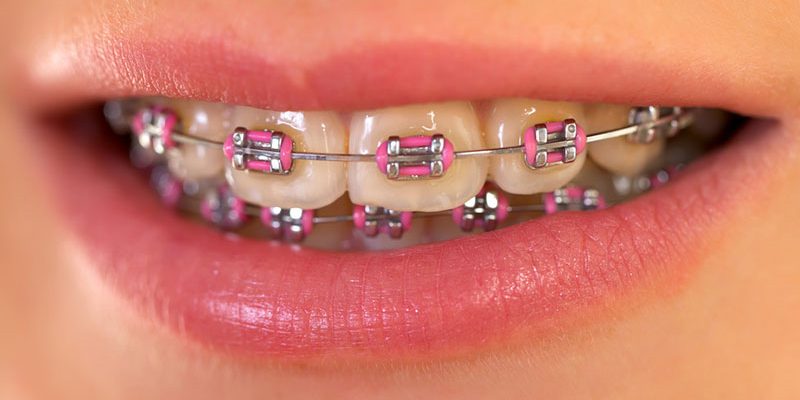
Good looks are important to everyone. In particular we tend to place a lot of stock in having a nice smile. We notice it in other people and we like to have the best possible smile we can have for ourselves as well. Unfortunately if you have crooked teeth getting in the way it can be a real disappointment and a reason to feel self conscious. But an Invisalign retainer could change all that.
So what’s an Invisalign retainer then – isn’t it just another set of braces?
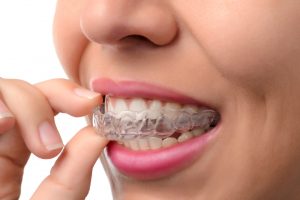
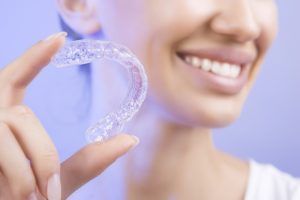
Not at all – and you’ll see the difference if you see a close up picture of what an Invisalign retainer looks like.
Let’s face it, braces are pretty ugly looking. If you’re wearing some and you open your mouth to smile, everyone will know you’re wearing them. It’s why plenty of people who wear braces have perfected the art of smiling with their mouth closed!
Wouldn’t it feel a whole lot better to act naturally and wear a set of aligners that no one can see? It might sound impossible but it’s not if you opt for the Invisalign retainer.
So is this just another method of getting straighter teeth?</.h3>
Yes it is. It’s worth bearing in mind that you’ll need to have a proper consultation with your dentist to see whether you’re suitable to wear the Invisalign aligners. While they are suitable for lots of people, braces may prove more worthwhile in some cases. But thousands of people have already got the teeth – and the smile – they want, thanks to this type of retainer. So it’s definitely worth considering it if you’re not happy about your teeth.
An Invisalign Retainer vs normal braces
If you’ve ever seen anyone wearing a brace you will know how visible they are. It’s no wonder people get very self conscious wearing them, because everyone can see them. They’re also attached to the teeth and have metal and wires as part of the design. This means they can be uncomfortable and irritating and make the wearer feel very awkward when smiling or talking to other people.
You don’t get any of this with a Invisalign retainer. The retainer is designed to be virtually invisible. Indeed lots of people in all walks of life choose Invisalign because it is very difficult for other people to even tell they’re wearing it. Even if they do notice, the Invisalign retainer doesn’t stand out anywhere near as much as braces do. If it is important to you that you should keep your teeth straightening process as secret as possible, Invisalign can help vastly in this way.
Of course you have to weigh up the potential cost of using the invisalign system and whether you can afford it. But the results more than speak for themselves when you read the positive reviews Invisalign has gotten from happy customers so far. Braces may work but they’re not the most comfortable or aesthetic way to get straighter teeth. An Invisalign retainer could be the best answer for you.
So you started making some contacts (media contacts) by sending out emails on behalf of your tech blog, have done all the SEO correctly and now you need to show off the shiny new gadgets. The good news here is that you do not need a top of the line dSLR camera or expensive studio lighting to achieve some quality photos for your blog. In order to make your Do It Yourself Photo Lab you will need is any basic digital camera, a tripod, 3 empty coffee cans, wood, alligator clips, close line clips, parchment paper, 3 clamp lights and some 100 watt soft light bulbs (or equivalent compact florescent bulbs if you want to reduce heat and save on energy cost).Do It Yourself Photo Lab – The stage
Foam board is your best friend. It’s cheap and it’s available at nearly any craft store, Target, Walmart or Supermarket in America. I prefer to pick up the all white foam board, but if you’d like one side to have a color (possibly for future backdrops) then by all means go ahead. The key here is that the board is bright white because this board will be used as your backdrop and also used as your reflector to shine some of the light back towards the camera and add depth to your photos. You will need at least 2 pieces of foam board for this project – the first piece will be beneath the product and the second piece will be upright angled behind the product to reflect light back towards the camera.Do It Yourself Photo Lab – The lights
Head on down to your local hardware store and go to the lighting section. You will want to pickup a 3 or 4 pack of 100 watt Soft White light bulbs or the equivalent compact florescent soft light bulbs. In this section you will also find clamp lights — I recommend getting 8 and 1/2 inch clamp lights, the important step here is to make sure they are rated for up to 150 watts power just in case you want to add brighter lights down the road. In order to help keep the clamp lights firmly attached in your photo setup I recommend picking up a pack of A clamps (alligator clips). If you live near a Big Lots they sell 2 packs of Alligator clips in their automotive section for $3.00 a set. You will also need close line clips (those wooden clips used to hang clothes back in the day) and a roll of parchment paper (this will be your light diffuser) which they may or may not have at the hardware store. If all else fails you can head to the supermarket to pick up these items.Do It Yourself Photo Lab – The stands
Stick in a can, stick in a can – your light stands will be made out of empty buckets or empty coffee cans filled with quick set cement and a 6ft 1 x 2′ piece of wood. You’ll need to mix up the cement and fill the empty buckets or cans and then place the stick into the mix and allow it to dry for a couple hours (yes it says quick dry cement will harden in 5 to 10 minutes, but keep in mind these are buckets not a surface repair). In order to ad versatilty to your stands I recommend letting the stick rest up against the side of the can that way you will be able to put two stick in a cans next to each other and clip them together for a more rigid light stand (possibly to hang other items from besides lights). Your hardware store checklist – empty cans (metal or plastic), scrap wood (1 x 2′ pieces of the height you’d like your light stands), bag of cement (50lb bag),Do It Yourself Photo Lab – Putting it all together
Once you’ve assembled your stick in a cans you’ll want to clip on your clamp lights. The clamp of the clamp light doesn’t always make the best grip so either add a secondary clip with an alligator clip or add a towel around the 1 x 2′ before clamping on. For my lighting setup I made 3 stick in a cans — 2 for lights and a 3rd to use to lean my foam board against as a backdrop. If you do not have a good table to work with for this projector I recommend using a couple saw horses so that you have the flexibility to walk around your lighting and make adjustments easily. You will need to use the close line clips to clip on some parchament paper to the front of all your clamp lights. This will help diffuse the lighting so the brightness is spread over a wider area instead of being harsh and focused.
Lay down a piece of foam board and place your product on it. Place a second piece of foam board vertically behind the product. For the lights I angle them at 45 degrees so that both lights make the product the focal point and ultimately reduce as much shadowing as possible. Once the lights are on you can play with the foam board behind the product to see what angle gives the best reflection to bring out the highlights and details of the product.
Position your tripod directly between the two lights and adjust the image settings to manual so that you can adjust the lighting for florescent. You’ll want the camera to use a low ISO (around 100 if possible) so you’ll need to do some test shots to see what ISO is being used. If it is possible to adjust the ISO manually then set it to 100 otherwise just make sure your product as plenty of light and you are using a solid tripod to eliminate any shakes (at low ISO’s the slightest shake will result in image blur).This image was shot using a Canon SD780IS and all the items described above. After completing the shot I used Adobe Photoshop CS4 to adjust the white level. The total cost of the materials to build my photo studio was $70, but I have left over materials to build 3 more stick in a cans and I have 2 spare foam boards. On the plus side I now have lighting for both video and photography for less than it would cost to get one. A Do It Yourself Photo Lab is a great investment and I think the image above speaks for itself on what can be done with a basic digital camera and a one-time investment of $70.
Taking the right pictures and tagging them for Seo is just part of the whole SEO efforts to get a site ranking. Give it a try.
Published By: Varsity Car Care: Your Premier Mobile Car Detailing Service San Antonio The Science of Steam Cleaning Excellence Steam cleaning represents the gold […]
FOR IMMEDIATE RELEASE Mauro C. Martinez: The Artist Transforming Memes Into Fine Art Masterpieces Contemporary painter bridges digital culture and traditional oil […]
Best Bay Fishing Destinations in the Gulf of America The Gulf of America is a vast and vibrant coastal fishery, known for producing a wide variety of saltwater species […]
Trees grow fast—keep yours in shape with professional trimming from 1 Two Tree Trimming San Antonio. Professional vs DIY Tree Trimming: Which Is Better? Trimming trees […]
This Blog was posted by Clearview Dental – Family Dentistry in Milton, On About Lingual Orthodontics Local Orthodontist With lingual orthodontics your teeth can […]